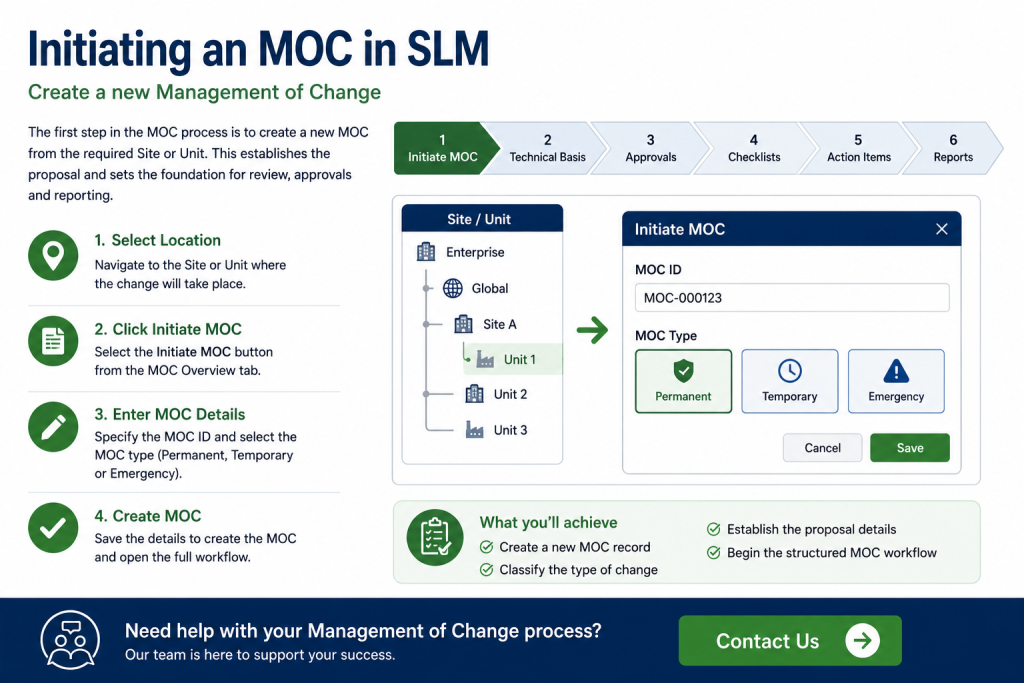
Initiating a Management of Change
Initiating an MOC is the first step in managing engineering, operational and safety-related changes within Safety Lifecycle Manager (SLM). A properly initiated Management of Change (MOC) ensures that proposed modifications are documented, assessed and reviewed before implementation, helping organisations maintain the safety and integrity of their facilities.
The SLM Management of Change module guides users through a structured workflow that captures key project information, assigns approval responsibilities and prepares the change for technical review. This standardised approach helps organisations demonstrate compliance with internal Management of Change procedures while supporting functional safety best practices.
This guide explains how to initiate an MOC in SLM, configure the proposal, select the appropriate technical basis and prepare the change for the remaining stages of the Management of Change process.
What Is Initiating an MOC?
Initiating an MOC creates a new Management of Change record within SLM and establishes the foundation for the complete change management process. During this stage, users define the proposed change, identify its location, classify the MOC type and begin collecting the information required for technical evaluation and approval.
The training explains that the Management of Change module is designed to help organisations document proposed changes, evaluate their impact and ensure that modifications do not compromise the safety or integrity of the facility. Once an MOC has been created, users are guided through a series of structured steps covering technical basis selection, approval gates, checklists, action items and reporting.
Initiating an MOC provides the starting point for:
- Documenting proposed engineering changes.
- Identifying safety and operational impacts.
- Assigning technical reviewers and approvers.
- Managing approval workflows.
- Capturing supporting documentation.
- Maintaining an auditable Management of Change process.
Why Initiating an MOC Is Important
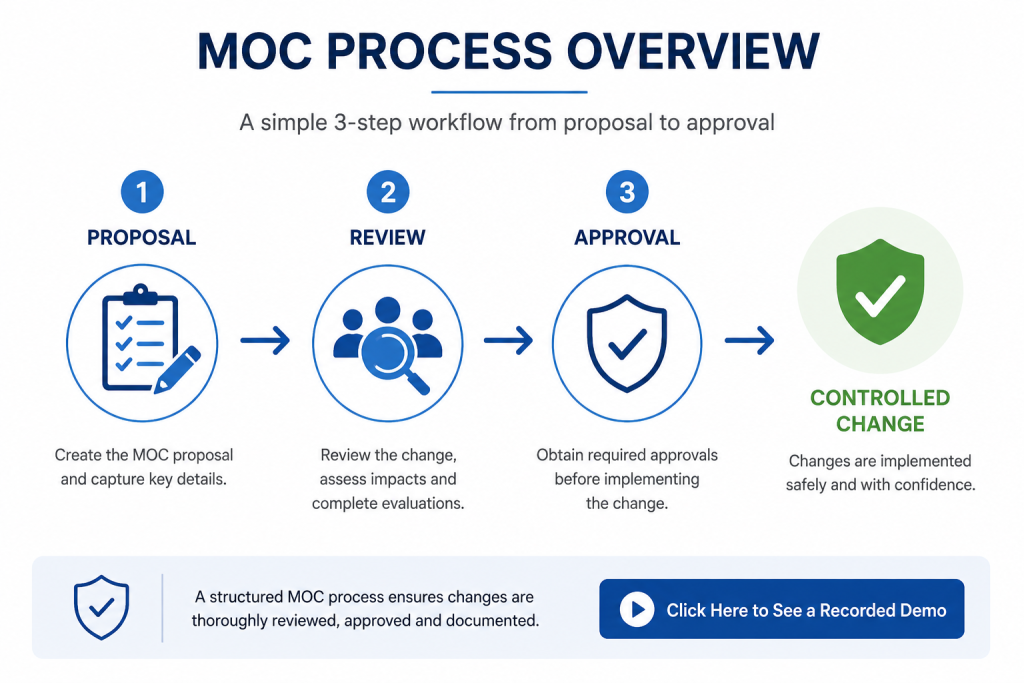
A formal Management of Change process helps organisations evaluate potential risks before modifications are introduced into operating facilities. By recording the purpose of the change, its technical basis and the required approvals at the very beginning, engineering teams can identify issues early and reduce the likelihood of introducing unintended hazards.
Initiating an MOC also provides a consistent workflow that supports collaboration between engineering, operations and safety personnel throughout the lifecycle of the proposed change.
Key benefits include:
- Standardised change management procedures.
- Improved functional safety governance.
- Clear accountability throughout the approval process.
- Better visibility of proposed engineering changes.
- Support for audit and regulatory compliance.
- A complete record of the Management of Change process.
Where changes involve Safety Instrumented Systems, organisations may also benefit from understanding the wider functional safety requirements described in the IEC 61511 Compliance guide.
Creating a New MOC
Creating a new Management of Change begins by navigating to the required Site or Unit within the SLM Management of Change module and selecting the Initiate MOC option from the MOC Overview tab.
Users are then prompted to enter basic information required to create the new MOC, including:
- MOC ID.
- MOC type.
- Title.
- Location.
- Health and safety impact.
- Associated P&IDs.
- Major process equipment.
Once the information has been saved, SLM creates the MOC object and presents the complete Management of Change workflow. The training demonstrates that the workflow consists of eleven structured stages, allowing users to move through each phase using either the navigation tabs or the workflow arrows displayed across the top of the MOC screen.
Completing these initial proposal details ensures that subsequent technical reviews, approval gates and checklists are based on accurate project information from the very beginning of the Management of Change process.
Choosing the Correct MOC Type
One of the first decisions when initiating an MOC is selecting the appropriate Management of Change type. Safety Lifecycle Manager supports three MOC categories, allowing organisations to classify changes according to their urgency and operational requirements.
The available MOC types are:
- Permanent – Long-term engineering or operational changes that become part of the normal facility design.
- Temporary – Short-term modifications that will be removed or reversed after a defined period.
- Emergency – Urgent changes that must be implemented quickly while still following an approved Management of Change process.
Selecting the correct MOC type improves reporting, supports compliance activities and helps ensure that the appropriate review process is followed throughout the lifecycle of the change.
Completing MOC Proposal Information
After creating the MOC, users complete the proposal information that forms the foundation of the entire Management of Change process. Accurate information at this stage ensures that reviewers, approvers and engineering teams clearly understand the scope and purpose of the proposed modification.
Typical proposal information includes:
- MOC title.
- Project location.
- Health and safety impact.
- Associated P&IDs.
- Major process equipment.
- Supporting engineering information.
Providing complete proposal details at the start of the workflow improves communication, reduces unnecessary clarification during approvals and creates a comprehensive audit trail for future reference.
Where the proposed change affects Safety Instrumented Systems or related engineering documentation, completing these fields thoroughly also supports later technical reviews and risk assessments.
Selecting the Technical Basis
The technical basis is one of the most important elements when initiating an MOC. Rather than serving only as descriptive information, the selected technical basis determines which Engineering, Health and Safety (EHS) assessments and checklists become available during the remainder of the workflow.
Users can identify whether the proposed change affects areas such as:
- Safety.
- Reliability.
- Operability.
- Health.
- Financial performance.
Once these selections have been made, Safety Lifecycle Manager automatically populates the appropriate EHS risk assessments. This ensures that every Management of Change follows a review process appropriate to the nature of the proposed modification rather than relying on manual checklist selection.
This automated approach helps organisations apply consistent engineering reviews while reducing the possibility of important assessments being overlooked.
Understanding the MOC Workflow
After the proposal has been created, users progress through a structured Management of Change workflow consisting of multiple stages. Each stage focuses on a specific aspect of the review process, guiding engineering teams from the initial proposal through to final approval and reporting.
The workflow includes activities such as:
- Initiating the MOC.
- Selecting the technical basis.
- Completing approval gates.
- Performing EHS assessments.
- Managing action items.
- Generating the final Management of Change report.
Users can navigate through the workflow using either the process tabs or the visual step indicators displayed within the MOC object. This structured approach makes it easy to understand project progress while ensuring that mandatory activities are completed before the Management of Change moves to the next stage.
Where corrective actions are identified during the review process, they can later be managed through the Action Item Tracker, providing continued visibility until every required action has been completed.
Configuring Approval Gates
Approval gates ensure that critical Management of Change activities are reviewed before users can continue to the next stage of the workflow. Rather than allowing an MOC to progress automatically, Safety Lifecycle Manager pauses the process at predefined approval points until authorised personnel have reviewed and approved the proposed change.
During initiating an MOC, administrators can assign different approvers to each approval gate, allowing engineering, operations and management personnel to participate at the appropriate stages of the workflow.
Approval responsibilities can be configured for:
- Initial MOC approval.
- Pre-change approval.
- Pre-startup approval.
- Final MOC approval.
Approvers are managed through the Personnel module, where users can be granted Management of Change approval authority for specific sites or units. This role-based approach helps ensure that only authorised personnel can approve changes affecting safety-critical systems.
Managing Checklists and Action Items After Initiating an MOC
As the Management of Change progresses, Safety Lifecycle Manager automatically presents checklists based on the selected technical basis. These checklists help engineering teams review environmental impacts, safety considerations, human factors, training requirements and other areas relevant to the proposed modification.
Where additional work is identified, users can create action items directly from checklist questions. Each action item can be assigned to an individual, prioritised and tracked throughout the Management of Change process.
Key capabilities include:
- Creating new action items from checklist responses.
- Assigning responsibilities to individual users.
- Setting priorities and target completion dates.
- Monitoring open and completed actions.
- Reviewing outstanding actions before approval gates.
Action items created during the MOC are also available within the Action Item Tracker, allowing organisations to manage corrective actions alongside those generated by Functional Safety Assessments, audits and other SLM modules.
Using Initiating an MOC as the starting point for every proposed engineering change helps ensure that action items, approvals and supporting documentation remain connected throughout the complete Management of Change process.
Reporting and Dashboards
Once the Management of Change has progressed through all workflow stages, Safety Lifecycle Manager can generate a comprehensive MOC report summarising the complete change process.
The report includes information such as:
- MOC proposal details.
- Technical basis selections.
- Checklist responses.
- EHS assessments.
- Approval history.
- Action items.
- Post-startup review information.
In addition to formal reports, the MOC module provides dashboards that allow users to monitor open MOCs, approval queues, assigned action items and project status. These dashboards improve visibility across the Management of Change process and help organisations identify overdue approvals or outstanding actions before they impact project schedules.
Initiating an MOC Best Practices
Initiating an MOC correctly establishes the foundation for every subsequent stage of the Management of Change process. Spending time to complete proposal information accurately and configure the appropriate technical reviews helps improve engineering quality while supporting compliance with internal procedures and recognised functional safety practices.
Recommended best practices include:
- Select the correct MOC type before creating the proposal.
- Complete all proposal information before requesting approvals.
- Choose an appropriate technical basis to generate relevant assessments.
- Assign authorised approvers for each approval gate.
- Review and complete all mandatory checklists.
- Create and manage action items as they arise.
- Use dashboards and reports to monitor MOC progress and outstanding approvals.
Following these practices helps organisations maintain a structured, auditable and repeatable Management of Change process while reducing the risks associated with engineering modifications.
Organisations that standardise Initiating an MOC across all engineering modifications benefit from greater consistency, improved governance and a more complete audit trail for future reviews.
Related Resources
Authoritative External Reference
For internationally recognised guidance on functional safety management throughout the safety lifecycle, including Management of Change activities for safety instrumented systems, see the IEC 61511-1 Functional Safety standard.
Initiating an MOC
0:06
Welcome to this Application Explainer video, part of our Management of Change topic range.
0:11
In this video, we’ll cover the subject of initiating of an MOC.
0:17
The SLM Management of Change module is used to complete the Management of Change process, document the effects, and ensure the changes being made are thoroughly thought through and do not compromise the safety and integrity of the facility.
0:30
The SLM MOC module allows users to walk through an intuitive step by One will be creating an MOC, Chapter 2 will be the technical basis selection, Chapter 3 will be the approval gates setting up approvers, Chapter 4 will be checklists, available checklist configuration, Chapter 5 will be action items, and Chapter 6 will be the reports available.
1:06
In Chapter 1 we’ll cover how to create an MOC object, MOC proposal properties, and things to consider.
1:13
What type of MOC are we trying to create?
1:17
Once we navigate to the MOC module, we can go to the Site object or the Unit object where we want this MOC to take place.
1:25
From there we can simply click on the Initiate MOC button on the MOC Overview tab.
1:31
This will pull up a pop up window where we can specify the MOCID and select the type of MOC Permanent, Emergency or Temporary.
1:41
This will help with reporting purposes later on, but once we specify our ID and select which MOC type it is, we can save that and it will navigate us to the actual MOC object itself.
1:56
Once we’re on the MOC object, you’ll see that there are 11 steps that help you walk through the MOC process.
2:03
The tabs across the top also reflect the steps in the arrows that you can see here.
2:08
You can either click on the tab itself or on the arrow and it will navigate you to those pieces.
2:14
If we go back to the Initiate MOC tab, you’ll notice some MOC proposal fields that need to be populated for the actual MOC process.
2:24
So again, is it temporary, permanent, emergency?
2:28
What’s the title, location, health and safety impact?
2:32
We can also associate PN IDs by clicking on this to allow us to look at a checkbox of all the PN IDs that are available.
2:40
We can also associate this piece of major process equipment.
2:44
So there are a lot of options here to get you started with the MOC process.
2:51
In Chapter 2, we’ll cover how to select the different technical basis for the MOC and effects of technical basis selection.
3:00
So again, on the MOC object that you have on the initiating MOC tab, there’s a field here for the technical basis for the MOC.
3:09
And this is going to be a really important field because it helps drive what questions and checklists are made available to the user.
3:17
So by clicking on this, we have a check box here that we can select from and say this MOC effects reliability, safety, operability, health, financial.
3:30
And from there, that technical basis is going to drive these different EHS risk assessments in Step 4 that are made available to the user.
3:40
And that is why this field for EHS risk assessments is not editable.
3:45
If we edit this, it’s not an editable field.
3:49
It’s just populated based on the selections for the technical basis.
3:53
So this is a very important field to help gather the information needed for the MOC.
4:02
In Chapter 3, we’ll cover how to assign approval gates for MOC process and how to configure personnel to be approvers and things to consider.
4:11
Who’s responsible for the approvals?
4:13
Is their role configured to allow approvals?
4:17
So as you notice in the diagram of the arrows with the different steps up here at the top, there are four marked as red step 368 and 10.
4:27
These represent different approval gates throughout the MOC process that essentially will not allow the individuals to continue on with the MOC until those approvals have been made.
4:39
So once we initiate an MOC, we can gather its properties, we can run through the initiation checklist, but we can’t move on to the EHS risk assessment until the initial approval has been made.
4:50
Now, if we want to add an individual as an approver for each of these gates, we’d Scroll down on the Initiate MOC tab to the various approval gates that we can see here and we can simply remove.
5:03
I’ll click the Add Approver button and from there it will pull up a check box of individuals that are available to be considered approvers for the MOC process, and we can click them and save and it will add them to the approval process.
5:17
You have to make sure that the right people are set up to be approvers within the MOC module.
5:22
We do that from within the personnel module.
5:25
So if we navigate to the personnel module, we can see for this site the list of personnel that we have available.
5:32
We see that Robert O’Neill here is not listed as an approver.
5:36
So we can click on his actual account here.
5:40
We can go through and see some of his roles.
5:42
We can see some of his competencies, and now we can go through and actually check confirm as an approver and save.
5:50
That will create a background task to reindex this individual’s account.
5:54
And we can also then go to their approval authority and we can manage their approval authorities at this particular site.
6:04
So with that, if we want to make them the approver of an MOC process for this particular unit, we could manage their approval authorities.
6:12
We can select this particular unit, hit next.
6:17
Once here, we can Scroll down for different event types, look for the management of change.
6:25
We can select for all of the units that we made available, or we can select for the individual unit here.
6:31
So we select primary approver and click save.
6:37
That will then save the personnel roles.
6:39
And now we can see on Robert O’Neill that the management of change process, he’s set up as a primary approver.
6:46
So if we go back to the MOC module and we go back to our unit and back to our feed pump upgrade MOC process, again on this initial approver place, we can add an approver.
7:01
And now you’ll see Robert O’Neill has the authorities that we could check and save and add him as an actual approver.
7:08
So that’s how you manage the roles to ensure that the right people are set up for each of these approval gates.
7:13
And again, because the MOC process has four different approval gates for different parts of the MOC, you can set up different individuals to be the approvers at each of the individual gates.
7:26
Once we look at the actual approval process, it’s the same as anywhere in the SLM system.
7:31
We can submit to the individual.
7:34
They have the ability to come in here, approve, disapprove, escalate, or remove the approval.
7:39
If they have the authority, they could self approve.
7:41
So that would be how you manage the approval gates and the users for the MOC system.
7:49
In Chapter 4, we’ll cover steps of the MOC process with checklists, all checklists available, and how to configure SLM MOC checklists.
8:00
So in the MOC there are various steps, again based on the technical basis for the MOC.
8:07
The MOC will auto populate with different EHS risk assessments.
8:12
The first checklist that we’ll look at is the initiation checklist.
8:17
It’s simply 16 items that you can look at as a yes, no question and be able to come in, check a box, submit any comments that you may have and save changes.
8:31
Once you select the technical basis for the MOC and it auto populates with those EHS risk assessments on step four, there are various checklists that you can click on and the same idea in here, different items, yes or no to them.
8:51
Any comments that you may have, you simply answer them by checking the box fitting in the comments field.
8:59
So depending on those technical bases, it’s going to auto populate with different checklists like environmental impacts, human factors, safety, protective systems, training and procedure.
9:11
For the PSSR, the pre startup safety review piece, there are some safety review items that you can go through and checklist those as well.
9:21
And from the post startup review as well, any action items that may be available still are in there.
9:28
So you have Step 2, step four and step 7 have different checklists that are available to the user.
9:34
SLM is a very configurable system.
9:36
So let’s say you want to edit or alter these checklists.
9:40
We could look at this environmental impact checklist here and we can see it has 10 items.
9:46
From here, let’s say we want to edit this checklist or edit the initiation checklist.
9:51
If we have admin authority, we can navigate to the SLM system module.
9:56
From there, we can look at the verification checklists, or we could search through here.
10:02
So if I search for MOC and hit enter, we can see the MOC initiation checklist.
10:07
I can simply click on that, and from here we have the checklist items #1 ID, the description, etc.
10:16
If I want to edit this, I can simply edit it and change the description, change the question, change the item number, hide it, change the order.
10:26
If I want to look at environmental impact, I can simply come down to the verification checklist, Scroll down to the environmental impact list, and we’ll see again, those are those 10 items here.
10:39
Again, if we want to edit or change them or remove them or add a new checklist item, we can simply go through that process within the SLM system module to either add, remove, or alter these checklists.
10:51
It’s a highly configurable system.
10:52
Now with that, obviously SLM does come with out-of-the-box checklists available to the user.
10:58
So based on just standard usage, they’ll already be populated with these particular checklists based on the EHS risk assessments that are selected.
11:07
But if you want to alter them or change them or add additional checklists, you could certainly do that as well.
11:17
In Chapter 5, we’ll cover how to add action items, managing action items for MOC completion, and things to consider.
11:25
Who is responsible for action items.
11:29
So anywhere in this MOC where there is a checklist, you have the ability to add action items for these.
11:36
So we have all of the items here and we can go through and click yes, no and make our comments.
11:42
But on the left side here, you’ll see the plus button to add an action item.
11:46
We can simply click on that.
11:48
We can create a new action item, or we can copy an existing one that may already exist that matches the exact same action that we need.
11:56
We’ll create a new one.
11:58
We’ll put the orders, free date created today, categories B, MOC step.
12:06
This is on the initiation checklist action needed.
12:12
We can open or close the status.
12:14
We can look at specific roles for the individual that we’re going to assign the action item to mainly to be, or we can assign it to an individual there and we can hit save.
12:24
Once we’ve created the action item, it’s going to auto populate up in the MOC action items table above these checklists so we can see what was created and where it all is and how we can look at the information for the action items.
12:39
So this would be the action item that was created here.
12:44
It’s got high priority, it’s assigned to an individual, it’s open and we can manage those action items from that process.
12:52
Anywhere there’s a checklist, you have that same functionality to add an action item.
12:56
So again, on the EHS risk assessments for environmental impact, we can go through and we can add action items in here as well.
13:04
We’ll also be able to see the action items that’s still here from an initiation phase, from a pre change phase.
13:11
All of these are available and open for the MOC action item process.
13:16
There are also gates through this MOC process that allow you to review these action items prior to moving on.
13:23
So prior to approval to change, we have an EHS Action item review which will pull up.
13:28
Any open action items that are still available may need to be addressed prior to the approval change.
13:34
They can either be looked at and closed out, or they can be moved forward and approved upon.
13:39
So we have the EHS Action item review from the PSSR stage.
13:45
If there are any action items that come out of these, we can capture them here.
13:48
The post startup review, if there are any action items available, we can look at that here as well.
13:53
So this is how we manage the action items that come out of the MOC process.
13:59
Additionally, when you have an action item, they’re also created specifically in the MOC module that you can manage here and in the action item tracker module as well.
14:10
So if we click on that, it takes us to the action item tracker.
14:14
We can see all of the information, target dates, action taken, and all of that kind of information.
14:21
It’s got hyperlink back to the MOC module and back to the MOC that we were looking at.
14:25
We can look at the approval authority for this action item as well.
14:29
So there’s a way to manage those action items within the MOC module, but those items will also simultaneously be populated in the Action Item tracker for management as well, where you can see other types of action items, whether it be from an FSA or a standalone.
14:46
So that’s how you manage the action items from within the MOC process.
14:54
In Chapter 6, we’ll cover printing, final MOC reports, other reports available, and dashboards available.
15:03
So as we complete our MOC process, the last step in each of the Mocs is the MOC report.
15:12
So it’s set up in this way with each of the different tabs representing different steps that you see here.
15:17
We can simply click on them to open it up.
15:19
We can see action items.
15:21
We can see any information from the initial approval, risk, summary, reports, etc.
15:27
From this MOC report tab, we can simply click on print.
15:31
It will schedule to create the MOC report.
15:34
It will send us an e-mail and a notification within the system.
15:38
From here, we can also look at the Reports tab.
15:42
We can see an action item assigned, MOC lists, and MOC Report.
15:48
Or again, we can click a specific MOC ID, open Mocs by type that have not been closed yet.
15:54
So if I generate this, we can see a list of the permanent temporary emergencies where they’re open.
16:02
These bold underlines are hyperlinks.
16:04
So again, we can click on this and I can see 51 Mocs open lists and go through all of those.
16:11
We can look at overdue Mocs.
16:13
If they’re not done at the right times, we can look at those, what category they fall into, and we can look at other reports as well.
16:21
Additionally, in the MOC module at the site or unit level, there are different dashboards available for the user.
16:28
So as an individual user and on your account, you have the ability from a site or from unit to look at specifically the action items that are assigned to you.
16:38
So my account doesn’t have any, but they would populate in here if there were any assigned to me.
16:44
This is an approval queue for any MOC items that were sent to me for approval if I had approval authority.
16:52
And then this is a table full of the Mocs that are available.
16:55
I can view mine, I can view all of them.
16:59
I can view the approval queue for just me, or I can view it for all of the approval queues and the action items.
17:05
Again, I can view just mine, or I can view all of the action items that are available and understand who they’re assigned to.
17:12
There’s dashboards to look at the Mocs, myopen Mocs here, or view all action items assigned.
17:20
It’s the same kind of idea.
17:22
View all so we can see all of the information for the site level, for the unit level, and access those pieces of documentation.
17:32
When we generate an MOC report, it queues up a background task to send an e-mail to the individual.
17:39
So in this e-mail we’ll have a link to download the file or the file itself attached.
17:45
Once we put up that file, it will be a formatted MOC report for the MOC that you had.
17:50
It will go through an overview.
17:52
It will go through the checklist from an initiation standpoint, EHS risk assessments and the answers and comments for each of those EHS risk assessments depending on the technical basis, the pre startup safety review questions, again, any action items, any approval to startup comments and go through this as a formatted report.
18:13
So this is available to the individual user as well as all of the dashboards throughout the SLM system.


