
SLM Database Configuration Guide
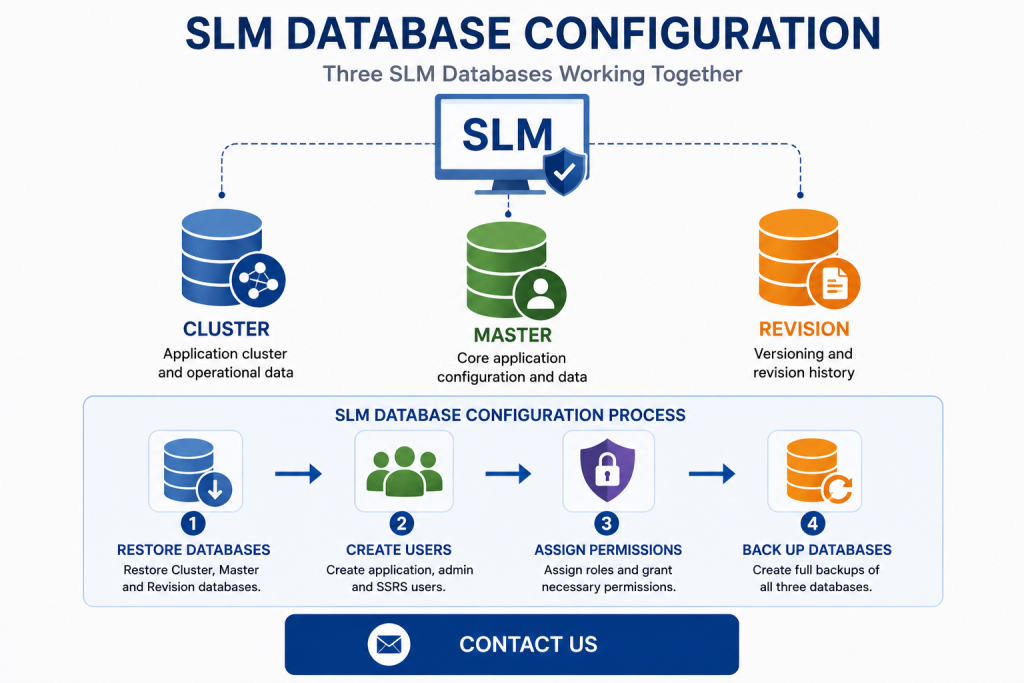
SLM database configuration establishes the Microsoft SQL Server databases, users and permissions required by Safety Lifecycle Manager. SLM uses three databases—Cluster, Master and Revision—which work together as part of the application’s underlying database environment.
After the databases have been restored, administrators create the database logins and users required by SLM. Different roles are assigned to the application, administration and SSRS users according to the level of database access each requires.
This guide explains the SLM database configuration process demonstrated in the training, including database restoration, login and user creation, database roles, stored procedure and function permissions, API-related permissions and full database backups.
Understanding SLM Database Configuration
SLM uses Microsoft SQL Server to store and manage application data. The SLM database configuration demonstrated in the training consists of three databases:
- Cluster
- Master
- Revision
Each database must be available within the SQL Server environment before the associated users and permissions can be configured.
The overall configuration process can be divided into four main stages:
- Restore the three SLM databases.
- Create the required SQL Server logins and database users.
- Assign the required roles and permissions.
- Create backups of the configured databases.
For information about the wider server environment surrounding these databases, see the SLM On-Premise Hardware and Software Requirements guide.
Restoring the SLM Databases
The first stage is restoring the Cluster, Master and Revision databases from their supplied SQL Server backup files.
The training demonstrates the restoration process through SQL Server Management Studio. Once connected to the appropriate database server, the administrator opens the database restore function and selects the backup file as the restore device.
The process is performed separately for each database:
- Restore the Cluster database.
- Restore the Master database.
- Restore the Revision database.
After all three operations have completed successfully, SQL Server Management Studio should show the Cluster, Master and Revision databases within the server’s database list.
The supplied database backup files and deployment-specific database names should be used when performing an actual SLM installation rather than relying on example filenames from the training.
Creating SQL Server Logins for SLM
Once the databases have been restored, the next SLM database configuration step is creating the three SQL Server logins used to access the databases.
The training identifies:
- Application login
- Administration login
- SSRS login
The application login is used by the SLM application, the administration login provides the required administrative database access, and the SSRS login is used by SQL Server Reporting Services reports to retrieve data.
The training creates these logins using SQL statements executed against the SQL Server master database. The login-creation statements specify the appropriate login name and associated password.
After the statements have executed successfully, the new logins can be reviewed within the Security and Logins area of SQL Server Management Studio.
Configuring SLM Database Users and Roles
Creating the server logins is only part of the process. A corresponding database user must then be created for each login within each of the three SLM databases.
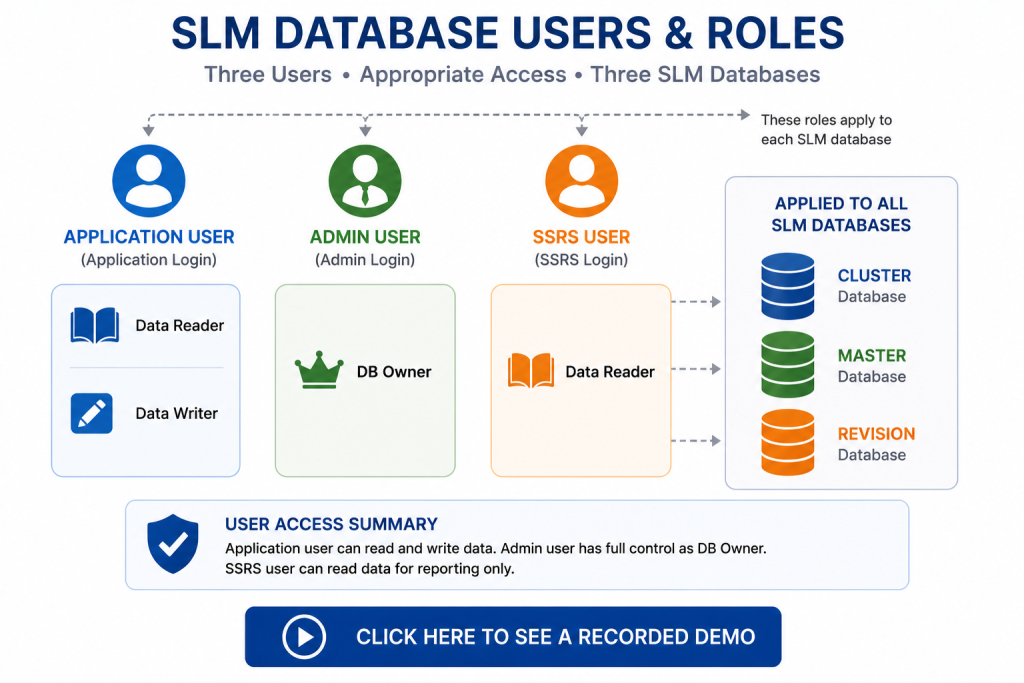
The SLM database configuration demonstrated in the training assigns different database roles according to the purpose of each user:
- Application user – Data Reader and Data Writer
- Admin user – DB Owner
- SSRS user – Data Reader
The application user therefore has the read and write access required by the application. The admin user receives the database-owner role, while the SSRS user is limited to reading the data required for reporting.
The user-creation and role-assignment script must be applied to each of the SLM databases: Cluster, Master and Revision.
After the script has executed, administrators can review the Users area of each database and inspect role membership to confirm that the expected users and roles have been created.
Assigning Stored Procedure and Function Permissions
Additional permissions are required for SLM to use stored procedures and database functions.
After the users have been created, the training demonstrates granting permissions for:
- Stored procedures
- Scalar functions
- Tabular functions
The supplied SQL script iterates through the relevant database objects and assigns the required permissions to the specified user.
Execution permissions are granted for the applicable stored procedures and scalar functions. Select permissions are granted for the applicable tabular functions.
The process is performed for the application, admin and SSRS users and must be applied across the Cluster, Master and Revision databases as demonstrated in the training.
These scripts form part of the SLM-specific database configuration. Administrators should therefore use the MSS-supplied SQL scripts for their deployment rather than attempting to recreate the permission statements from this overview.
Database Permissions Required by the SLM API
The training demonstrates one further permission associated with the SLM application and API.
A view-definition permission is assigned so that the application can inspect database metadata required by the API. The training explains that this includes information such as:
- Primary keys
- Foreign keys
- Default column values
This metadata is used by the API when performing model-level validations for operations such as updating or deleting records.
The permission is executed against the SQL Server system master database rather than the SLM Master database, making that distinction important when applying the supplied configuration script.
For more information about how external applications interact with SLM, see the SLM API Usage Guide.
Creating Full SLM Database Backups
The final procedure demonstrated in the SLM database configuration training is creating a full backup of each database.
Within SQL Server Management Studio, the administrator selects the required database and opens the Backup function through the Tasks menu.
The demonstrated process is:
- Select the database to back up.
- Open Tasks and select Backup.
- Set the destination to disk.
- Remove the default destination where necessary.
- Select the required backup folder and filename.
- Confirm that the backup type is Full.
- Enable compressed backup.
- Run the backup.
This process is repeated for the Cluster, Master and Revision databases so that each SLM database has its own backup file.
Microsoft provides additional technical information about creating full SQL Server database backups. SLM-specific filenames, locations and configuration should continue to follow the deployment information supplied by MSS.
Configuration vs. Ongoing Database Maintenance
SLM database configuration and database maintenance are closely related, but they serve different purposes.
Configuration establishes the databases, access accounts and permissions required for SLM to operate. It also provides the initial process for creating full database backups.
Ongoing maintenance covers recurring activities performed after the environment has been configured, including scheduled backups, integrity checks, cleanup, index maintenance and statistics maintenance.
For those recurring tasks, see the SLM Database Maintenance Guide.
Keeping these responsibilities separate makes it easier for administrators to distinguish between initial or deployment-related database setup and the recurring maintenance required throughout the life of the SLM environment.
Reviewing the Database Configuration
After completing the configuration process, administrators should confirm that the required database components demonstrated in the training are present.
A practical review should confirm:
- Cluster, Master and Revision databases are restored.
- The application, administration and SSRS logins exist.
- Corresponding users exist within each SLM database.
- Each user has the appropriate database role.
- Required stored procedure and function permissions have been applied.
- The required API-related database metadata permission has been assigned.
- Full backups can be created for all three databases.
SLM database configuration provides the foundation for database access by the application, administrators, reporting services and API. Once that foundation is established, recurring maintenance and monitoring can be managed as separate operational activities.
Database Configuration
0:06
Welcome to this IT Explainer video, part of our configuration topic range.
0:10
In this video we’ll cover the subjects of databases within SLM.
0:15
SQL Database or Structured Query Language Database is a type of database management system that stores data in tables and allows users to interact with the data using SQL queries.
0:28
It provides a structured and organised way to store, retrieve, and manipulate data.
0:33
SQL databases are widely used in various applications and industries due to the flexibility, scalability, and ability to handle large volumes of data efficiently.
0:44
The following information will be covered in this training chapter.
0:47
One will be restoring databases, Chapter 2 will be setting up users, chapter 3 will be views and stored procedure permissions, and chapter 4 will be database backups.
1:01
In chapter one we will review the procedure for restoring databases utilised by SLMSLM uses 3 databases, Cluster master and Revision.
1:12
Let’s go over the restore process.
1:14
Once connected to the database server, let’s right click on the databases and click on Restore database.
1:21
Since we’re restoring from a backup file or a BAK file, we need to select the device and let’s select the backup media.
1:29
Let’s start with the cluster database.
1:33
Let’s click OK and then click OK again, and we can see that we’ve restored the cluster database.
1:46
Let’s follow the same process to restore the master and the revision databases.
1:52
Restore database, select device.
1:57
Let’s add the device master.
2:08
We’ve now restored the master database.
2:12
Restore database again.
2:14
We’ll select our device and select the revision database.
2:26
We’ve now restored the revision database.
2:30
Now we can see all three databases have been restored.
2:32
The SLM uses the cluster, the master, and the revision.
2:39
In Chapter 2, we’ll cover how to set up the users the SLM uses to access the databases.
2:46
These include admin users, application users, and SSRS users.
2:53
Once SLM database has been restored, we need to create the three logins that are going to be used by SLM to access the databases.
3:01
These three logins are going to be the application login, the administration login, and the SSRS login which will be used by the SSRS reports to retrieve data from the database.
3:14
The SQL statement that we’re going to be using to create those logins is going to be CREATE Login, the login name with the password for each associated login.
3:24
Let’s copy these SQL statements.
3:28
Let’s click on a new query.
3:33
We have to make sure that we have the master database selected, and let’s click Execute.
3:38
The logins have now been created.
3:40
If we go to the security and refresh the logins folder, we can see the three logins have been created here.
3:49
Now that the logins have been created, we need to create a user for each login for each of these databases.
3:56
At the same time, for each of these users, depending on the access, we need to assign specific roles.
4:02
Let’s take a look at the roles assigned to each one of these users.
4:06
So we’re going to create an application user using the application login and to this user we will assign the role of data reader and data writer.
4:16
Then for the admin user which is going to be using the admin login, we will assign the role DB owner.
4:24
And then for the SSRS user, we’re going to assign data reader only since this user’s only going to access data requested by the SSRS reports.
4:34
So if we copy this SQL statement, we need to run this script on each of the SLM databases.
4:41
So let’s start with the cluster.
4:44
Click execute.
4:45
Now if we open up the cluster database and we go to security, go to users, and click refresh, we’re going to be able to see that the free users were created.
4:57
Let’s click on the admin user.
4:59
If we go to memberships, the DB owner role has been assigned.
5:05
The application user has Data Reader and Data Writer roles assigned and the SSRS go to membership.
5:19
It has the Data Reader role assigned.
5:23
Now let’s go ahead and run the same script on the master database for SLM Gold.
5:31
Here under the Users folder.
5:33
If we click Refresh again, we can see the three users have been created.
5:38
And lastly, we’ll run the script on the revision database.
5:50
Now we’ve created the free users for the free databases that SLM will use to access data.
5:59
In Chapter 3, we will cover how to apply permissions for views, stored procedures, and functions in SLM databases.
6:08
Once the users have been created, we’ll need to grant execution and select permissions on stored procedures, scalar functions, and tabular functions that will be used inside SLM to retrieve data or perform processes in the database.
6:23
Let’s go over the SQL script that will grant those permissions.
6:26
Let’s start with the first user, which is going to be the application user.
6:31
So what we do here is to declare an iterator that will go through all of the stored procedures and scalar functions and start granting execution permissions for each one of those assigned and assign the permissions to the user, which in this example is the application user.
6:49
After that’s done, we’ll need to also perform the same process but assigning the grant select permission for tabular functions.
6:57
So we have the declaration of the iterator that will go through each one of the tabular functions and it will grant the select permission for each one of those for the specified user.
7:07
Now if we copy this script, if we go to the cluster database, right click and select New Query.
7:15
So we’re going to start running this for the SLM app user.
7:18
Click execute.
7:20
Now let’s run the same script for admin, and now let’s run it for the SSRS user.
7:30
We need to run the same process, the same script for the master and revision databases.
7:36
So let’s go to the master database, start with the application user, the admin, and then the SSRS user.
7:54
Now let’s do that for the revision database appuser, the admin and the SSRS user.
8:07
And this is how we grant, execute and select permissions for the users to the stored procedures, tabular functions, and scalar functions in the database.
8:17
And the last permission that we need to assign is the grant view to any definition assigned to the SLM app.
8:24
This permission will allow the API to take a look at all the default values for each one of the SLM databases.
8:31
When we talk about default values, we’re talking about primary keys, foreign keys, default values for columns for each one of the tables in SLM.
8:39
This information is required by the API to perform validations at the model level when we are, for example, updating records or deleting records.
8:48
Let’s grab this SQL script.
8:50
Let’s start a new query.
8:52
Let’s make sure that we’re on this master SQL Server database.
8:55
Not the SLM master but the actual SQL Server and let’s execute this permission.
9:07
In chapter four, we will cover how to generate a database backup.
9:11
In order to create a backup for SLM databases, we need to follow the following process.
9:17
Let’s right click on the database, hover over tasks and click on backup.
9:22
Destination is going to be backup to disk.
9:26
We need to remove any default destination and let’s add our own one.
9:36
Let’s look for the desired folder which is the SQL DB backups.
9:42
Now let’s use the name prod_slmgold_cluster dot bak for the name.
9:49
Click OK OK again, make sure the backup type is full.
9:58
Go to the backup options and make sure under compression we’re going to use compressed backup.
10:08
Let’s click OK.
10:11
As we can see, we’ve created a backup for the cluster.
10:15
We’re going to repeat the same process for master and revision.
10:20
So let’s right click, go to Tasks and Backup.
10:26
Find our desired folder and give the backup a name.
10:39
In this instance is going to be the master.
10:42
Click OK, set the compression that’s been completed successfully.
10:52
Now let’s backup the revision database.
10:59
Add the destination folder, add the name, make sure the backup type is full, set the compression, click OK and that’s been completed successfully.
11:27
And this is how we backup SLM databases.


